Senin, 08 Desember 2008

LIBURAN DIDEV-NET

ajib juga liburan hari ini di warnet dev-net daerah kranggan,citeureup-bogor.
karena di ajarin untuk membuat blog secara cuma2 kan mna ada diajarin secara gratis dengan yang ahlinya,,,hari gini...
sudah diajarin abis gitu nyate bareng teman-teman yang sedang mengikuti...

hahahahahaha.... i love you full.... peace...

mungkin


3. Network Komputer di LINUX (20')
4. Ngeblog (1)
  • Pilih nama
  • Cara nulis
  • Mempercantik Blog
Refferensi :
- Perintah dasar klik
  • vim
  • logoput/shutdown (remote)
  • talk
  • wall
  • ifconfig
  • route
Fasilitas yang akan diusahakan :
- Proyektor
- Alat tulis
- Komputer + internet
- Nyate.. (ini mah.. dari peserta ajah ya....!!!)


Salam dan selamat belajar
me(Suwidi)

Monday, September 22, 2008

Starting samba and setting up user accounts

taken from http://ubuntuforums.org/showthread.php?t=202605


1.1 Starting samba and setting up user accounts


Let us fire up samba for the first time. Type:

Code:
 sudo /etc/init.d/samba start
There shouldn't be any errors - if you are presented with an error message make sure everything is correct (search for typos and/or invalid paths).

Time to add yourself as an samba user.

NOTE: You will be asked for a password - make sure you use the same as you use for login!

Code:
 sudo smbpasswd -L -a your_username
sudo smbpasswd -L -e your_username
In case you need other users to be able to access the share you need to add them to your system AND samba as well. Make sure you use the very same Windows usernames and passwords!

NOTE: Windows XP doesn't set passwords for its useraccount per default. If you haven't set a password on your XP box just press enter when prompted to enter a password for the user account you're about to create!

In the following example we will add an user called "mark" ...

Example:

Code:
sudo useradd -s /bin/true mark
sudo smbpasswd -L -a mark
sudo smbpasswd -L -e mark
The "-s /bin/true" in the first line prevents the users from being able to access the commandline of your linux box ("-s" stands for "shell"). I strongly advise you to follow this recommendation! Don't change that setting to a valid login-shell unless you really know what you are doing!

Repeat this step until you configured all user accounts!

Now that we configured samba and created the user accounts we are done with the Linux-part - there's one more thing to do in Windows.

Ubuntu 8.04 Hadry To Ubuntu Moslem Edition


Jul 15, '08 11:31 PM
for everyone
  dari terminal 
gksudo gedit /etc/apt/sources.list

tambahkan di sources.list
deb http://ppa.launchpad.net/ubuntume.team/ubuntu hardy main # Ubuntu Muslim Edition
deb-src http://ppa.launchpad.net/ubuntume.team/ubuntu hardy main # Ubuntu Muslim Edition

jalankan
sudo aptitude update

install ubuntume paket
sudo aptitude install ubuntume

Content UbuntuMe

Main softwares

  • ubuntume-artwork: customized usplash, GDM theme, Metacity theme, cursor, wallpapers etc.
  • minbar: Islamic prayer times application
  • zekr: Quranic Study Tool
  • zekr-quran-recitation-online-*: all available online recitations
  • zekr-quran-translation-*: all available translations
  • monajat: application that popups prayers every predetermined time
  • firefox-praytimes: Firefox extension that displays Islamic daily prayer times
  • webstrict: UI frontend to DansGuardian (web content filtering tool)
  • thwab: Electronic Encyclopedia System
  • Hijra: Islamic calendar

Multimedia

  • libdvdcss2: Library for accessing DVDs
  • libdvdread3: library for reading DVDs
  • w32codecs: Win32 codec binaries
  • ogle: DVD player with support for DVD menus
  • vlc: multimedia player and streamer
  • flashplugin-nonfree: Adobe Flash Player plugin
  • gstreamer0.10-ffmpeg: FFmpeg plugin for GStreamer
  • gstreamer0.10-pitfdll: GStreamer plugin for using MS Windows binary codecs
  • gstreamer0.10-plugins-bad: GStreamer plugins from the "bad" set
  • gstreamer0.10-plugins-bad-multiverse: GStreamer plugins from the "bad" set (Multiverse Variant)
  • gstreamer0.10-plugins-ugly: GStreamer plugins from the "ugly" set
  • gstreamer0.10-plugins-ugly-multiverse: GStreamer plugins from the "ugly" set (Multiverse Variant)
  • liblame0: LAME Ain't an MP3 Encoder
  • msttcorefonts: Microsoft TrueType core fonts

Education

  • kturtle: educational Logo programming environment
  • stellarium: real-time photo-realistic sky generator
  • celestia: A real-time visual space simulation
  • kstars: desktop planetarium
  • kalzium: chemistry teaching tool
  • atomix: puzzle game for building molecules out of isolated atoms
  • kig: interactive geometry program
  • kmplot: mathematical function plotter
  • kpercentage: percentage calculation teaching tool
  • kbruch: fraction calculation teaching tool
  • tuxmath: math game for kids with Tux
  • tuxpaint: A paint program for young children
  • tuxtype: Educational Typing Tutor Game Starring Tux
  • xaos: real-time interactive fractal zoomer
  • khangman: the classical hangman game
  • ktouch: touch typing tutor
  • gcompris: Educational games for small children

Miscellaneous

  • sun-java6-jre: Sun Java(TM) Runtime Environment (JRE) 6
  • compizconfig-settings-manager: Compiz configuration settings manager
  • fusion-icon: tray icon to launch and manage Compiz Fusion
  • rar, unrar: Archiver/Unarchiver for .rar files
  • command-not-found: Suggest installation of packages in interactive bash sessions
  • nautilus-open-terminal: nautilus plugin for opening terminals in arbitrary local paths
  • glipper: Clipboard manager for the GNOME panel
  • wallpaper-tray: wallpaper changing utility
  • scribus: Open Source Desktop Page Layout
  • inkscape: vector-based drawing program
  • virtualbox: x86 virtualization solution
  • bzr: easy to use distributed version control system
  • aptoncd: Installation disc creator for packages downloaded via APT
  • galternatives: graphical setup tool for the alternatives system
  • startupmanager: Grub and Splash screen configuration
  • acroread, mozilla-acroread, acroread-plugins: Adobe Reader, Mozilla plugin
  • skype: A VoIP software
  • acetoneiso2: let You mount typical proprietary images formats of the Windows world such as ISO BIN NRG MDF IMG
  • ubuntu tweak: application designed to config Ubuntu easier for everyone.
  • envyng-gtk: install the ATI or the NVIDIA driver
  • gnochm: CHM file viewer for GNOME
  • pessulus: lockdown editor for GNOME
  • gnucash: A personal finance tracking program
  • clamtk: graphical front-end for ClamAV

Arabic support

  • language-pack-ar: translations for language Arabic
  • language-pack-gnome-ar: GNOME translations for language Arabic
  • mozilla-firefox-locale-ar: Mozilla Firefox Arabic language/region package
  • aspell-ar: Arabic dictionary for aspell
  • acon: Text console arabization
  • bicon: Console that supports bidirectional text display
source: http://www.ubuntume.com

Monday, September 15, 2008

Tinggalin Camera saat Mudik

(tentang IT)

tahun ini 2008 adalah kali pertama mudik bareng keluarga (anak+dan istri), tahun lalu belum punya anak, tahun lalu lagi belum punya istri.

nah rencannya pengen pulang dalam waktu yang lama (tanggal 26-spt s/d 7-Okt), rumah kontrakan tentu kosong. ad sementara ada barang2 yang masih harus dijaga.

kebetulan rumah ad 24 jam internet nah ide-punya ide pengen bikin CCTV dirumah. jadi selma mudik ke jogja masih bisa pantau rumah gitu. syukur2 bisa berlanjut dan untuk dipake terus-terusan (maaf, ngawasi pembantu saat kita dikantor)

cari-cari hendak dicari dengan kata kunci CCTV+LINUX maka ketemulah beberapa software yang canggih.

berawal dari cerita orang ini
http://ledow.blogspot.com/2005/09/cctv-motion-detection-and-linux.html

terus ketemu juga zoneminder tapi yang ini terlalu besar (enterprise) dan aq putuskan untuk mencoba Motion ( aj lah. ad sech yang dikit ngeganjal (tidak bisa disebut karena rasis)

http://sourceforge.net/projects/motion/

nah untuk lebih jelasnya nanti kalo masih ad wektu setelah saya install ya. ini lagi mau install dulu

Suwidi


Wednesday, August 06, 2008

Package gconf-2.0 was not found in the pkg-config search path. Perhaps you should add the directory containing `gconf-2.0.pc' to the PKG_CONFIG_PATH environment variable No package 'gconf-2.0' found

) /usr/bin/guile
checking for guile-config... /usr/bin/guile-config
checking for guile-tools... /usr/bin/guile-tools
checking if (www main) is available... no
checking for gconf-2.0 >= "2.0"... no
Package gconf-2.0 was not found in the pkg-config search path. Perhaps
you should add the directory containing `gconf-2.0.pc' to the
PKG_CONFIG_PATH environment variable No package 'gconf-2.0' found
configure: error: Library requirements (gconf-2.0 >= "2.0") not met;
consider adjusting the PKG_CONFIG_PATH environment variable if your
libraries are in a nonstandard prefix so pkg-config can find them.

the solution is :


server@server-LTSP:~/source/gnucash-2.2.6$ sudo apt-get install libgnome2-dev
Reading package lists... Done
Building dependency tree
Reading state information... Done
The following extra packages will be installed:
libaudiofile-dev libavahi-client-dev libavahi-common-dev libavahi-glib-dev
libbonobo2-dev libdbus-1-dev libesd0-dev libgconf2-dev libgcrypt11-dev
libgnomevfs2-dev libgnutls-dev libgpg-error-dev libidl-dev liblzo-dev
libopencdk8-dev liborbit2-dev libpopt-dev libselinux1-dev libsepol1-dev
libtasn1-3-dev libxml2-dev
Suggested packages:
libgcrypt11-doc libgnome2-doc gnutls-doc gnutls-bin
Recommended packages:
orbit2
The following NEW packages will be installed:
libaudiofile-dev libavahi-client-dev libavahi-common-dev libavahi-glib-dev
libbonobo2-dev libdbus-1-dev libesd0-dev libgconf2-dev libgcrypt11-dev
libgnome2-dev libgnomevfs2-dev libgnutls-dev libgpg-error-dev libidl-dev
liblzo-dev libopencdk8-dev liborbit2-dev libpopt-dev libselinux1-dev
libsepol1-dev libtasn1-3-dev libxml2-dev
0 upgraded, 22 newly installed, 0 to remove and 0 not upgraded.
Need to get 4955kB of archives.
After unpacking 17.2MB of additional disk space will be used.
Do you want to continue [Y/n]? Y
Get:1 http://us.archive.ubuntu.com feisty/main libaudiofile-dev
0.2.6-6ubuntu3 [116kB]
Get:2 http://us.archive.ubuntu.com feisty/main libavahi-common-dev
0.6.17-0ubuntu3 [57.0kB]
Get:3 http://us.archive.ubuntu.com feisty-updates/main libdbus-1-dev
1.0.2-1ubuntu4 [335kB]
Get:4 http://us.archive.ubuntu.com feisty/main libavahi-client-dev
0.6.17-0ubuntu3 [51.5kB]
Get:5 http://us.archive.ubuntu.com feisty/main libavahi-glib-dev
0.6.17-0ubuntu3 [27.7kB]
Get:6 http://us.archive.ubuntu.com feisty/main libidl-dev
0.8.7-0.1ubuntu2 [102kB]
Get:7 http://us.archive.ubuntu.com feisty/main liborbit2-dev
1:2.14.7-0ubuntu1 [459kB]

Monday, May 05, 2008

VMware on Ubuntu 8.04

After few month my computer run without VMWare now finally it run agin,
please look at this article


taken from : http://howtoforge.com/vmware-server-on-ubuntu8.04

Needed if upgrading VMware installation:

sudo ./vmware-install.pl

VMware wont compile with the new kernel, use this patch:

wget

http://vmkernelnewbies.googlegroups.com/web/vmware-any-any-update-116.tgz
tar -zxf vmware-any-any-update-116.tgz
cd vmware-any-any-update-116

Apply the patch:

sudo ./runme.pl
sudo vmware-config.pl

VMware console wont run without this:

cp /lib/libgcc_s.so.1 /usr/lib/vmware/lib/libgcc_s.so.1/libgcc_s.so.1

You might need gcc3.4 as well.

Enjoy!

Tuesday, April 22, 2008

XDA-2 with Windows Mobile 6

Last November I upgraded my XDA-2 to windows mobile 6 (Tofclok-edition).
my device run well for few month, and since last month suddenly got some
problem.

Radio is run but no incoming call, the device appear GPRS icon. and
actual GPRS is work with no problem.
SMS also no problem. the problem is happen on calling/incoming call.

I suspect it happen caused by leak of Storage, available only 15MB.
I run my XDA-2 for few aweek without Calling feature so i decide to
upgrade to another ROM. I've tried to upgrade with many radio version.
(1.17. 1.18, 1.19) but not work.

finally I got
http://www.4shared.com/file/38873287/f565f1a7/C_ShekharWM611bR16P32_public.html

upgrade everything and remove anythings, then my XDA-2 device run well

Jakarta, 22-Apr-08
Suwidi

Friday, March 21, 2008

Enabling or Disabling ROOT on Ubuntu o

Jika Ingin memperbolehkan ROOT maka berikan pasword root dengan cara (tidak disarankan) :


$sudo passwd root

sedangkan jika terlanjur dan anda sadar dan ingin memperbolehkan ROOT maka lakuka

$sudo passwd -l root

Saran:

untuk bekerja sebagi ROOT selama sesi maka gunakan saja

$sudo -i

Atau bisa juga

$sudo -s


Tuesday, March 18, 2008

Cara Ngeredirect Halaman website

How to automatically redirect a browser
to another web page from one of your own

diambil dari

http://35.9.68.172/services/computing/faq/auto-redirect.html.

________________________________________________________________________
Server-based redirect
This is the preferred method of redirecting to other web pages, and
additional information can be found at
http://www.w3.org/QA/Tips/reback.


As the P-A Department's main web server uses the Apache HTTP server
program, here is how to do it on that system (for other systems'
servers, see the references in the www.w3.org web page noted above).

Create a file in the directory in question called ".htaccess" and put
into it the line

Redirect /path-of-file-to-be-redirected URL-of-page-to-go-to

For example, if you are a professor teaching the (fictitious - for the
sake of the example only) PHY386 course during Spring Semester 2007, but
you want to keep your web pages in a subdirectory of your own user area
instead of in the courses area provided, you can go to the appropriate
courses area on the server, /web/documents/courses/2007spring/PHY386 and
put

Redirect /courses/2007spring/PHY386/index.html http://www.pa.msu.edu/people/username/subdir/index.htm


(all on one line, in case the above example is wrapped by your browser)
into a file called .htaccess which has world-read permissions (that's
the default).

The "path" argument is relative to the "web root", so in the above
example, "/web/documents" is left off. The "page to go to" URL is a full
URL, even if the web page is on the same server. More than one Redirect
command can be put into the .htaccess file, and you can redirect all
files in a directory to their equivalents in a "to go to" directory by
leaving the filenames off.

A case where more than one Redirect command may be necessary is when a
web page may be accessed via more than one URL. In the above "PHY 386"
example, in fact, the instructor will have to add a second line, the
same as the first, except for lower-case "phy386" instead of "PHY386" in
the "path" argument, because the web page may be accessed with the
"phy386" URL, too. During Spring Semester 2007, the page could also be
accessed with URLs with "current" in place of "2007spring" and with
"2007spring" left out entirely, bringing the number of Redirect commands
up to six for that one page. Fortunately, a URL which leaves off the
"index.html" filename defaults to assuming it, or else three more
Redirect commands would be needed to handle those cases. (The folks at
w3.org still consider this as preferable to a single "refresh" meta
command in the file itself, which would be read and acted upon
regardless of how the file was accessed, as described below.)

If there is already a .htaccess file in the subdirectory in question,
see the Apache HTTP server documentation to see where in it the Redirect
command should be placed. If you are the person running the Apache web
server program on a system, you can also put instances of the Redirect
command into the server configuration file instead of, or in addition
to, .htaccess files in specific subdirectories (again, see the Apache
HTTP server documentation for the details).


________________________________________________________________________
"refresh" meta command
Note that this method is deprecated by the official HTML standards
organization in favor of the server-based redirect method described
above.

You can set up a web page to inform any browser which happens to load it
that there is another web page it should go to instead, after an
optional delay.

This is accomplished using a "refresh" meta command in the header
section

<head>
.
.
</head>

of your HTML file, along with the title and any "keywords" or other meta
commands.
Syntax
The syntax for the "refresh" meta command is

<meta http-equiv="refresh" content="N; URL=other-web-address">

where N is the approximate number of seconds that you want the current
web page to be displayed before the browser automatically goes to the
other web address. If N = 0, then the browser should go immediately to
the other web address.
Netiquette tip
In case someone's browser doesn't handle these automatic redirects (most
browsers do handle them, but some allow them to be turned off, as a way
of discouraging "web spam", which often uses this type of "refresh"
redirect), you may want to provide a second route to the intended
destination by way of a standard link (see the example, below).
Example
<html>
<head>
<title>A web page that points a browser to a different page after 2 seconds</title>
<meta http-equiv="refresh" content="2; URL=http://www.pa.msu.edu/services/computing/">
<meta name="keywords" content="automatic redirection">
</head>
<body>
If your browser doesn't automatically go there within a few seconds,
you may want to go to
<a href="http://www.pa.msu.edu/services/computing/">the destination</a>
manually.
</body>
</html>

Select Example above or here to see how the example works in practice.


________________________________________________________________________
Notes on scripting languages
There are also ways of doing this with JavaScript, VBscript, and other
internal web page scripting languages, but explaining them in detail is
beyond the scope of this web page. A few examples may illustrate the
method, however, and encourage users to obtain actual JavaScript
documentation (a book, or online) to guide them in developing their own
variants suited to their own needs.

The following JavaScript example, which would go ahead of the first
<html> flag on the web page, or between the <HEAD> and </HEAD> tags,
opens the new site in the same browser window (effectively instead of
the rest of the contents of the page that the script is in):


<script language="javascript" type="text/javascript">
<!--
window.location="http://www.pa.msu.edu/services/";
// -->
</script>

This JavaScript example opens the new site in the same browser window
after displaying the current page in the window for 2 seconds (2000 ms):


<script language="javascript" type="text/javascript">
<!--
window.setTimeout('window.location="http://www.pa.msu.edu/services/"; ',2000);
// -->
</script>

(Note that this does exactly what the HTML META tag above does, but as
the META tag method does not depend on the browser's having JavaScript
available and active, in most cases the META tag method would be
preferable).

The next JavaScript example opens the new site in a new* browser window:


<script language="javascript" type="text/javascript">
<!--
Newsite= window.open("http://www.pa.msu.edu/services/","newsite");
// -->
</script>

* sometimes, the "new" window is one of those already opened in the
session; this seems to be somewhat random, and I don't know if it's a
browser bug or a "JavaScript thing" with the window.open command. Just
note that browser behavior may not always be consistent if you use this
script (or the next one, which also uses window.open). -- GJP.

This JavaScript example opens the new site in a new browser window after
a 4.5 second (4500 ms) delay:


<script language="javascript" type="text/javascript">
<!--
window.setTimeout('window.open("http://www.pa.msu.edu/services/","newsite")',4500);
// -->
</script>


________________________________________________________________________
WARNING: With these capabilities for automatic redirection to other web
pages, it is possible to set up a redirection loop -- try to avoid
making it a no-wait-time infinite loop! (An infinite loop with a
reasonable delay, on the other hand, might have its uses as a sort of
slide show, among other possibilities).
________________________________________________________________________
Still have questions? Try sites such as http://www.w3.org/,
http://httpd.apache.org/,

http://www.iis.net/ or
http://www.javascript.com/

(or just use Google™).

Mounting LVM2 Disk On UBUNTU 8.04

Ubuntu 8.04 alpha 6 yang saya gunakan untuk mengupgrade Fedora 3 dengan
LV2 format disk. Permasalahan nya adalah saya tidak bisa mounting LVM
langsung

- Disk SCSI 72 GB saya isi dengan Ubuntu 8.04
- Disk IDE 80 GB berisi Fedora 3 LVM format

Langkah nya :
1) Detect Hardisk IDE
$sudo fdisk -l
Disk /dev/sdb: 80.0 GB, 80026361856 bytes
255 heads, 63 sectors/track, 9729 cylinders
Units = cylinders of 16065 * 512 = 8225280 bytes
Disk identifier: 0x303bd925

Device Boot Start End Blocks Id System
/dev/sdb1 * 1 13 104391 83 Linux
/dev/sdb2 14 9729 78043770 8e Linux LVM

2) Install paket LVM2

$ sudo apt-get install lvm2 -y

3) Active-kan dm-*

$sudo modprobe dm-mod
$sudo vgchange -ay

4) mounting Volume

$ ls -l /dev/mapper/
total 0
crw-rw---- 1 root root 10, 63 2008-03-18 18:14 control
brw-rw---- 1 root disk 254, 0 2008-03-18 18:15 VolGroup00-LogVol00
brw-rw---- 1 root disk 254, 1 2008-03-18 18:15 VolGroup00-LogVol01

$sudo mkdir /mnt/sdb-lvm
$ sudo mount /dev/VolGroup00/LogVol00 /mnt/sdb-lvm

Selesai
__wd
(suwidi dev-NET)

Monday, March 17, 2008

Membuang file .src di Flashdisk dengan command line Linux

saya ingin mencari semua file .scr di flashdisk kemudian membuangnya. ini terjadi karena flashdisk kena VIRUS tatik.exe.

berikut cuplikannya

lakukan pencarian dulu supaya tidak salah pilih

#/media/disk# find ./  -name *.scr

kalo sudah pasti kemudian buang langsung

#/media/disk# find ./  -name *.scr -print -exec rm -r {} -f \;

ini ada ti[s yang lain yang bisa dipelajari


http://www.linux.org/lessons/tips/cmndline.html


Misc.

show libraries a binary uses

Sometimes its necessary to see what libraries a binary is using. For example, if you wanted to know what libraries MySQL is using, just issue this command:

ldd /usr/bin/mysql


substitutes for Netcraft

If you want to find out what operating system a server is using, you can go to Netcraft.com and use their 'What's that site running' service. But there are alternatives. With tools available for Linux, you can do it yourself. It requires curl and/or Lynx to be installed.

lynx -mime_header http://www.domain.com | grep Server

curl -sI http://www.domain.com | grep Server


show files changed on a certain date

If you need to find a file you changed on a certain date, this handy one liner will do it

ls -lt * | grep 'May 8' | awk '{print $9}'


change default editor

The default editor on some Linux machines may not be to your liking. This is particularly important for remote logins. If you wanted to change the editor to 'vim', an improved version of vi, you would do this:

export VISUAL=/usr/bin/vim


sort directories from smallest to biggest

Sometimes you check available space on your hard disk and you're surprised to find that you've recently occupied a lot more. If you're curious as to what's taking up the space, you can find out this way:

du -s -k * | sort -n


strings

If you've got some files that were created by proprietary software that's not longer supported and you need to get data out of them, you might try the 'strings' utility. It will find plain text in binary or other types of non-text formatted files.

strings file > newfile


date in YYYY-MM-DD

This comes in handy for shell scripts, especially if you're making backups. This date format is easily understood by all.

date +%Y-%m-%e

Here's an example of it in use:

tar -zcvpf backup_`date +%Y-%m-%e`.tar.gz *.*


change time stamp of a file

For some reason, you may need to timestamp a file. To simply change the date of a file to the current date and time, do this:

touch file

To change the timestamp to some time in the pass, issue this command:

touch -t YYYYMMDDHHMM file

Where YYYY = year, MM = month, DD = day, HH = hour and MM = minutes.


list all files except

This will list all the files in a directory except the wildcard you specify.

ls -I '*.html'


what's using memory

You may find that your computer is running a bit slower. You can easily find out what's using up your memory:

ps -aux | awk '{print $5,$6,$11}' | sort +1n


complete memory information

To see complete information about the memory your machine is using:

cat /proc/meminfo


change text colors

You can change the color of text in an xterm. This can come in handy it you're writing shell scripts. Try this example:

echo -e "\033[42;1m Pretty colors \033"


Erase the contents of a file

This will erase the contents of a file without eliminating the file

cat /dev/null > some.file


'shred' a file

Just like destroying documents with a paper shredder, computer files with sensitive information in them should also be 'shredded'. To do this, there is a command line utility on Linux systems called 'shred'. What this does is to overwrite the file multiple times with random output. This is secure, because if you simply erase a file with 'rm', all this does is to tell the operating system that this part of your hard disk is free to use, but the information still exists until that space is used. Special tools can be used to recover information from a file that's simply been deleted, but if you've 'shred' it, it would be nearly impossible to get that information back. So shred would be especially useful if you're going to sell or give your computer away to somebody.

The following command will shred a file, "zero" it (to hide shredding) and then remove it.

shred -zuv some.file

You could also 'manually' shred a file by doing the following:

cat /dev/urandom > some.file

This procedure also writes random information to a file. Unlike shred, you'll need to stop this process after a few seconds or some.file will begin to grow until it takes up all available space. When you've finished, simply erase (rm) the file.


delete files with 'bad' names

If you've ever had to delete a file you inadvertantly made, starting with a dash, for example, as you might have found out, it's not as easy as rm -file. You can delete it though - like this:

rm -- -file

or

rm ./-file


pop-up a reminder

You can pop up a message on your Linux desktop with this command:

(sleep 60; xmessage -near One Minute has gone by) &

This will pop up the message 'One Minute has gone by' after 60 seconds. Adjust to your needs accordingly.


Using 'find'


find files bigger than 1mb

This will find files in your home directory that are bigger than 1 megabyte

find /tmp -size +1000k -print


find recently modified files

This will show files that were modified within the last 24 hours in your home directory (if your name is mike)

find ./ -ctime -1 -user mike -print


find with size and access time

You can combine file size and access time with find

find ./ -size +1000k -and -atime +7 -print

Finds files larger than 1 MB that haven't been accessed in more than 7 days.


find and copy into multiple dirs

If you ever need to copy the same file into multiple directories and you can't use a symbolic link, then this trick will work:

find . -type d -name "2004*" -exec cp /file.html {} \;


remove unwanted dirs

Using a modification of the above example, you can remove directories. The following example will remove the temporary directories that the GIMP leaves behind.

find . -type d -name .xvpics -print -exec rm -r {} -f \;

Using 'grep'

Grep is a command line utility that's used mostly to find words in files. It is very powerful. After getting up to speed with it, you'll find that you can't work without it. The basic syntax is:

grep word file, or to use a real example, grep kiwi fruits.txt. This will show the line where the word appears in the file.

You don't have to restrict this to one word. You can search for entire sentences if you like. Just put more than one word inside single quotes.


Show only file name

The following will only show the names of the files where a given word appears

grep -wl 'word' *.*


grep file in a directory

This will search for a given word in an entire directory, including subdirectories

grep -r kiwi ~/my_files/*.rtf


You've got mail!

You can use grep to keep track of recently arrived mail. This one-liner will show you who's sent you mail

grep -c '^From:' /var/spool/mail/bob

The caret '^' tells grep to look for any line beginning with what you specify after.


End of the line

Here's an example of the reverse of the previous example. We can look for lines that end with a particular word or words. The following will show us the users on a Linux system that aren't real people

grep nologin$ /etc/passwd

Accounts for programs and daemons will normally end with 'nologin'.

grep this and this and this

Grep will also let you look for words that appear separately in a file. The following will look for the information for users bob, ted and joe in the /etc/passwd file:

grep "\(bob\|ted\|joe\)" /etc/passwd


Directory Assistance

If you have entered telephone numbers in files, you can use grep to look for them. The following will show you all of the telephone numbers in a given file:

grep '[0-9]\{3\}-[0-9]\{4\}' members.txt

This takes for granted that you've entered them in 000-000-0000 format. Different cultures write down telephone numbers in different ways, so you may have to substitute the the number of digits in the curly braces {2\} instead of {3\} ,for example, or subsitute the separating dash '-' with the character that's more common in your locale (a period '.', for example)


grep and grep

You can use grep more than once if you want to apply different options to two different things that you're looking for. The following pipes the Apache webserver log file to two different instances of grep. We're looking to see who's logged in at a page that are outside of our local network.

cat access | grep login.php | grep -v 192.168

Tuesday, February 19, 2008

IP Forwading on Ubuntu

Beberapa waktu lalu Server Ubuntu 8.04 dah bisa portforwading, dan gak masalah slama ini. nah kemaren itu aq install radius+ LAMP + chillispot dan hasilnya masih belum OK tapi yang jadi masalah adalah
- Chillispot itu melakukan Tunneling dan maskering DNS

ini menyebabkan ip forwading aq ikut berhenti bekarja. tapi cukup sulit juga ngedeteksinya
awalnya ping ke server aja dak mau tapi bukan RTO. dah 2-3 kali aq restart server tetep gagal. akhirnya aq buang semua paket yang baru aj aq install dan hasilnya OK
ping bisa reply dan SSH pun bisa dipake.

nah terakhit IP forwading, kok diem aj gak ad tanda2 kehidupan.
lalu aq lakukan tcpdump, untuk mengetahui apa yang terjadi dan LOG kernel

hasilnya

root@ubuntu:~# ping 10.10.10.1
PING 10.10.10.1 (10.10.10.1) 56(84) bytes of data.

[5]+  Stopped                 ping 10.10.10.1
root@ubuntu:~# ping google.com
PING google.com (64.233.167.99) 56(84) bytes of data.
64 bytes from py-in-f99.google.com (64.233.167.99): icmp_seq=458 ttl=236 time=398 ms
64 bytes from py-in-f99.google.com (64.233.167.99): icmp_seq=459 ttl=236 time=370 ms
64 bytes from py-in-f99.google.com (64.233.167.99): icmp_seq=461 ttl=236 time=472 ms
64 bytes from py-in-f99.google.com (64.233.167.99): icmp_seq=462 ttl=236 time=342 ms

ini lah LOG nya

 tcpdump -i eth1
tcpdump: verbose output suppressed, use -v or -vv for full protocol decode
listening on eth1, link-type EN10MB (Ethernet), capture size 96 bytes
14:19:21.961639 IP 192.168.3.3.netbios-ns > 192.168.3.255.netbios-ns: NBT UDP PACKET(137): QUERY; REQUEST; BROADCAST
14:19:21.961884 NBF Packet: Name Query, Name=WORKGROUP       NameType=0x1D (Master Browser)
14:19:22.117486 IP6 fe80::2e0:81ff:fe5a:4697.mdns > ff02::fb.mdns: 0[|domain]
14:19:22.117588 IP peroxide.local.mdns > 224.0.0.251.mdns: 0 PTR (QM)? 255.3.168.192.in-addr.arpa. (44)
14:19:22.117716 IP6 fe80::2e0:81ff:fe5a:4696.mdns > ff02::fb.mdns: 0[|domain]
14:19:22.117795 IP peroxide.local.mdns > 224.0.0.251.mdns: 0 PTR (QM)? 255.3.168.192.in-addr.arpa. (44)
14:19:22.269139 IP ubuntu.local > py-in-f99.google.com: ICMP echo request, id 53538, seq 295, length 64
14:19:22.961623 IP 192.168.3.3.netbios-ns > 192.168.3.255.netbios-ns: NBT UDP PACKET(137): QUERY; REQUEST; BROADCAST
14:19:22.961860 NBF Packet: Name Query, Name=WORKGROUP       NameType=0x1D (Master Browser)
14:19:23.127475 IP6 fe80::2e0:81ff:fe5a:4697.mdns > ff02::fb.mdns: 0[|domain]
14:19:23.127561 IP peroxide.local.mdns > 224.0.0.251.mdns: 0 PTR (QM)? 255.3.168.192.in-addr.arpa. (44)
14:19:23.127689 IP6 fe80::2e0:81ff:fe5a:4696.mdns > ff02::fb.mdns: 0[|domain]
14:19:23.127764 IP peroxide.local.mdns > 224.0.0.251.mdns: 0 PTR (QM)? 255.3.168.192.in-addr.arpa. (44)
14:19:23.269153 IP ubuntu.local > py-in-f99.google.com: ICMP echo request, id 53538, seq 296, length 64
14:19:23.961688 IP 192.168.3.3.netbios-ns > 192.168.3.255.netbios-ns: NBT UDP PACKET(137): QUERY; REQUEST; BROADCAST
14:19:23.961928

tail /var/log/messages
Feb 19 14:14:03 peroxide kernel: [16501.427473] device eth0 entered promiscuous mode
Feb 19 14:14:03 peroxide kernel: [16501.427489] audit(1203405243.757:4): dev=eth0 prom=256 old_prom=0 auid=4294967295
Feb 19 14:15:02 peroxide kernel: [16559.663523] device eth1 entered promiscuous mode
Feb 19 14:15:02 peroxide kernel: [16559.663539] audit(1203405302.037:5): dev=eth1 prom=256 old_prom=0 auid=4294967295
Feb 19 14:15:54 peroxide kernel: [16612.483652] device eth1 left promiscuous mode
Feb 19 14:15:54 peroxide kernel: [16612.483666] audit(1203405354.897:6): dev=eth1 prom=0 old_prom=256 auid=4294967295
Feb 19 14:19:21 peroxide kernel: [16825.668730] device eth1 entered promiscuous mode


nah solusinya ternyata cuma sepele

oxide:~$sudo  echo 1 > /proc/sys/net/ipv4/ip_forward


saya gak bisa pastiin, nilai ini berubah karena restart ato karena faktor yang aq sebutkan tadi, tapi yang jelas terakhir aq lihat nilainya adalah 0 (nol)


Monday, February 18, 2008

HowTo: DD-WRT+chillispot & freeradius & mysql

from
https://www.zlabinger.at/blog/2006/05/26/playing-with-linksys-wrt54gs/


HowTo: DD-WRT+chillispot & freeradius & mysql

or: how to become a hotspot ISP…

Status: Working, but security problems.

Security: It turned out, that only "WLAN&LAN" (with other words dev br0) works, therefore other LAN ports can not be used (traffic goes via bridge br0 and bypasse both the kernel netfilter and chillispot. "Solution": Only WAN ethernet-port can be used, but unauthorized access to the "exposed" web-server (not just port 80) and to the LAN-interface (IP) of WRT is still possible. Partly this is due to the implementation of chillispot, but the exposure of the web-server seems to be a general problem. If the access-point is not physically secure, utilization of chillispot in the AP is problematic anyway.

But: It works, and here is how to get that far:

Which device?

The DD-WRT is a open-source (GPL) third party software for many variants and OEMs of the Linksys WRT54G wireless LAN access point. I did my installations on a WRT54GS Version 1.1 (data according to http://en.wikipedia.org/wiki/WRT54G: Version 1.1, CPU-clock 200 MHz, RAM 32 MBytes, FLASH 8 MBytes, serial starts with CGN2.., Chipset: Broadcom BCM5325EKQM). I believe that the results with other variants of this product may be very similar.
Which Software?

I decided to update to the latest DD-WRT which is v23 SP1. DD-WRT seems to use openwrt as a basis. There are several versions available, I decided for the "standard" version. This package includes chillispot, a captive portal software.

What is chillispot?

chilispot: "When the user starts a web browser chilli will capture the tcp connection and redirect to browser to an authentication web server. The web server queries the user for his username and password. The password is encrypted (with uamsecret) and sent back to chilli (by means of redirecting the web browser). chilli forwards the authentication request to a radius server. The radius server sends an access-accept message back to chilli if authentication was successful."

DD-WRT includes a web-interface which allows the configuration of chillispot. By "saving" the configuration in the web-interface, actually a number of "nvram" variables are written in the WRT and the device is rebooted. On reboot, these nvram_chillispot-variables are read and a chillispot-configuration-file (chilispot.conf) is created at /tmp (/tmp is the mount point of the RAM-disk within the WRT) and chillispot is started with the command line parameter "-c /tmp/chillispot.conf".
But the naming of the variable name is a bit confusing:

  • uamsecret of chilli.conf is named UAM secret in the web-interface of the WRT and chilli_uamsecret in nvram
  • radiussecret of chilli.conf is named Shared key in the web-interface, chilli_pass in nvram and secret in (clients.conf [or potentially in the nas-sql table]) of freeradius (typical defaults are "secret" or "testing123″).

The web-interface seems to be unable to delete unused variables from nvram, therefore "nvram unset chilli_xxx" and "nvram commit" are required (via ssh/telnet).

What is needed beside chillispot?

A typical chillispot-configuration requires a web-server (typically Apache2.0, this is where the new user is redirected to and where she is presented a form to fill in a username and password), a RADIUS-server (typically freeradius, this is where chillispot sends the credidentials received from the web-server) and a SQL-server (typically mysql) which is used as a backend by the RADIUS-server.

Radius-Server, database and web-server typically run on a single Linux-box but can of cource run on seperate machines. A common configuration is to use a single server for a number of chillispots/a number of access points. In such configurations it may be convient to tunnel/encrypt traffic, but this is not essential and will not be covered by this document.

Authentication of the user is done in the following way:

  1. User associates her WLAN-client with the WRT, all traffic is directed to chillispot by the WRT.
  2. Chillispot assigns an IP (typically 192.168.182.x/24) to the WLAN-client via an DHCP-server inside chillispot (the DHCP-server of the WRT is not used).
  3. User enters an arbitrary URL in her web-browser
  4. The web-server inside chilispot resonds with a redirect to the URL defined in uamserver (eg. https:///cgi-bin/hotspotlogin.cgi)
  5. The user enters her username and password in a form
  6. The web-server redirects the browser to the web-server inside chillispot including the credidentials as parameters. If the "userpassword" flag of the default hotspotlogin.cgi is set, the password will not be encrypted. Important note: If the password is encryted, also radius will need an encrypted password, else authentication will fail!
  7. Chillispot creates a RADIUS authentication request (including the creditentials received from the user) to the RADIUS server
  8. Radius-server forwards the authentication as sql-query (SELECT statement) to the sql-database
  9. Radius-server receives response from database
  10. Radius-server sends response to chillispot
  11. Chillispot-webserver sends response to user ("logged in") and now works as a NAT for traffic coming from the client - user can now surf the net.

During this process a number of communication-channels are used:

  1. UDP port 67 (DHCP) between client and chillispot
  2. ARP between client and chillispot
  3. TCP port 443 (https) between client and web-server
  4. TCP port 3990 (http) between client and chilli-webserver
  5. UDP port 1852 (radius) between chilli and RADIUS-server
  6. TCP port 3306/unix socket (mysql) between RADIUS-server and MYSQL-server

The following methods are used to secure the communication-channels

  1. TLS (https) between client and web-server: server-certificate on web-server
  2. uamsecret (shared secret) between web-server/client and client/chillispot
  3. radiussecret (shared secret) between chilispot and RADIUS-server
  4. optional: CHAP (parameter userpassword in cgi-script on web-server) between web-server/client/chillispot/mysql

While encryption between client and web-server is strong, the other elements have only week security applied, especially dictionary attacks could be applied. Without optional CHAP there is no security at all between RADIUS-server and my-sql, therefore these two services should be hosted on the same machine.

Configuration of DD-WRT

This configuration (and more) is covered by the dd-wrt-Wiki( chillispot-simple-config.pdf) and also from http://www.jml.lalley.com/chillispot_howto.cfm.Some remarks:

  • During configuration you have to use the LAN-ports, later these ports shall NOT be used because traffic on the LAN-ports bypasses chillispot (both are "br0″ from chillispots point of view.
  • If you want have remote access (via the WAN-port), you have to enable it first (normaly ssh/http is only possible from the LAN and WLAN-ports.
  • Connect the wired network to the WAN-port of the WRT. Depending on your wired network (cooperate LAN, single DSL-router etc.) different networking configurations (DHCP, static IP) are required. I only tested with a static IP. The subnet here has to be different from the subnet used on the wireless network (controlled by chillispot's DHCP-server)
  • In total 3 subnets are used: WAN, LAN and chillispot. In normal operation the LAN-subnet is not used (but has to be used during configuration).
  • Access to the web-interface shall be protected by a username/password different from defaults (root/admin).

Configuration of chillispot

The best documentation can by found by typing chillispot �help. Another choice is the Wiki at https://wiki.ubuntu.com/ChillispotHotspot.

  • Configure "WLAN & LAN" - the other configuration options (WLAN, LAN) do not work

Configuration of web-server (Apache2.0)

The configuration of the web-server is covered by a posting on the chillispot-forum. There is illegal line-break before "+SymLinksIfOwnerMatch" inside the server-configuration, this option shall be in the same line as the "Options" directive.

The hotspotlogin.cgi can be found inside the chillispot source package.

Configuration of RADIUS (freeradius)

There is not much to do on this, but there is almost no documentation on the few steps required. The best configuration can be found in the Gentoo Howto at http://gentoo-wiki.com/HOWTO_Chillispot_with_FreeRadius_and_MySQL.

The shared secret radiussecret from chillispot has to be put into clients.conf of freeradius. This secret is used to authenticate the access to RADIUS. The radiusd.conf file contains a lot of comments. The best thing to to is to backup this file and remove all coment by typing

egrep -v '(^[ ]*#|^#|^$)'    file_name

This way it is also possible to compare different "recommended" configuration files found on the net. Basicly "sql" has to be put into the "accounting" section of radiusd.conf. In sql.conf the sql user/password/address has to be configured. To test the configuration it is usefull to run "radiusd -xxyx -l stdout" and check the debug output. Another possibilty is to test with the free radius server from https://radius.chillispot.org/radius/. I had no luck with this service because I could not find the uamsecret to use.Configuration of database (mysql)

A good tuturial on sql & freeradius can be found at http://www.frontios.com/freeradius.html
Freeradius ships with a set of SQL-queries inside sql.conf which are configured for a "typical" database structure which can be found inside the free-radius sources (/src/modules/rlm_sql/drivers/rlm_sql_mysql/db_mysql.sql). The database can be imported into sql (mysql -uroot -prootpass radius < db_mysql.sql). For authentication only a single table radcheck is required, other tables can be usefull for accounting. There are some php-interfaces to enter accounts etc, but it seems that theses interfaces (eg. sourceforge project phpmyprepaid) require variants of the database structure, at least I did not get them to work. So the best is to enter username and password by hand (eg. phpmyadmin).

Summary

It works. Due to security issues I think about moving chillispot out of WRT into the RADIUS/Apache box and install a VPN-tunnel (openVPN) to the WRT instead.


Monday, February 11, 2008

Gtk-WARNING **: This process is currently running setuid or setgid

My Edubuntu getting error and cannot login, no one can login include
server user


cat /home/server/.xsession-errors

(process:18084): Gtk-WARNING **: This process is currently running
setuid or setgid.
This is not a supported use of GTK+. You must create a helper
program instead. For further details, see:

http://www.gtk.org/setuid.html

Refusing to initialize GTK+.

(process:18088): Gtk-WARNING **: This process is currently running
setuid or setgid.
This is not a supported use of GTK+. You must create a helper
program instead. For further details, see:

http://www.gtk.org/setuid.html

Refusing to initialize GTK+.
/etc/gdm/Xsession: Beginning session setup...
GConf Error: Failed to contact configuration server; some possible
causes are that you need to enable TCP/IP networking for ORBit, or you
have stale NFS locks due to a system crash. See
http://www.gnome.org/projects/gconf/ for information. (Details - 2: IOR
file '/tmp/gconfd-server/lock/ior' not opened successfully, no gconfd
located: No such file or directory)


/tmp/ contain thousand orbit file

....................
orbit-server-fa7a3a1a
orbit-server-fa7aba5a
orbit-server-fa7abada
orbit-server-faba1a4a
orbit-server-faba9a8a
orbit-server-fafa7a3a
orbit-server-fafa7aba
orbit-server-fafafa7a
orbit-server-fafafafa
orbit-server-fb3b5b6b
orbit-server-fb3b5beb
orbit-server-fb3bdb2b
orbit-server-fb3bdbab
orbit-server-fb7b3b1b
orbit-server-fb7b3b9b
orbit-server-fb7bbb5b
orbit-server-fb7bbbdb
orbit-server-fbbb1b4b
orbit-server-fbbb1bcb
orbit-server-fbbb9b8b
orbit-server-fbfb7b3b
orbit-server-fbfbfb7b
orbit-server-fbfbfbfb
orbit-server-fc3c5c6c
orbit-server-fc3c5cec
orbit-server-fc3cdc2c
orbit-server-fc3cdcac
orbit-server-fc7c3c1c
orbit-server-fc7cbc5c
orbit-server-fc7cbcdc
orbit-server-fcbc1ccc
orbit-server-fcbc9c0c
orbit-server-fcf2f5f
orbit-server-fcf2fdf
orbit-server-fcfaf1f
orbit-server-fcfaf9f
orbit-server-fcfc7cbc
orbit-server-fcfcfc7c
orbit-server-fcfcfcfc
orbit-server-fd3ddd2d
orbit-server-fd3dddad
orbit-server-fd7d3d1d
orbit-server-fd7d3d9d
orbit-server-fd7dbd5d
orbit-server-fdbd1dcd
orbit-server-fdbd9d0d
orbit-server-fdbd9d8d
orbit-server-fdfd7d3d
orbit-server-fdfdfd7d
orbit-server-fdfdfdfd
orbit-server-fe3e5e6e
orbit-server-fe3e5eee
orbit-server-fe3ede2e
orbit-server-fe3edeae
orbit-server-fe7e3e9e
orbit-server-fe7ebede
orbit-server-febe1e4e
orbit-server-febe1ece
orbit-server-febe9e0e
orbit-server-febe9e8e
orbit-server-fefe7e3e
orbit-server-fefe7ebe
orbit-server-fefefe7e
orbit-server-fefefefe
orbit-server-ff3f5fef
orbit-server-ff3fdf2f
orbit-server-ff7f3f1f
orbit-server-ff7fbf5f
orbit-server-ff7fbfdf
orbit-server-ffbf1f4f
orbit-server-ffbf1fcf
orbit-server-ffbf9f0f
orbit-server-ffbf9f8f
orbit-server-ffff7f3f
orbit-server-ffff7fbf
orbit-server-ffffffff
root@devNET-LTSP:~# rm /tmp/orbit-* -R
-bash: /bin/rm: Argument list too long
root@devNET-LTSP:~# rm /tmp/orbit-server* -R
root@devNET-LTSP:~# rm /tmp/orbit-* -R
-bash: /bin/rm: Argument list too long
root@devNET-LTSP:~# rm /tmp/orbit-dev1* -R
-bash: /bin/rm: Argument list too long


solved by this command


root@devNET-LTSP:~# rm /tmp/ -rf
root@devNET-LTSP:~# mkdir /tmp
root@devNET-LTSP:~# chmod 777 /tmp/
root@devNET-LTSP:~# c /tmp/

Saturday, February 09, 2008

CCLFOX billing on Ubuntu

Arikel beritkut ini membantu saya dalam proses instalasi billing dev-NET(internet) / Warnet

terima kasih untuk http://ubuntulinux.or.id/blog/2007/11/06/install-billing-warnet-cclfox-di-ubuntu/


Install Billing Warnet cclfox di ubuntu

Buat temen-temen yang ingin menggunakan Billing warnet Cafe Con Leche, aku sudah menerjemaahkan ulang dan membuat paket debian untuk Ubuntu/Debian

Paket debian program CCL versi bahasa indonesia:
1. libccls_0.7.1-2_i386.deb => Pustaka Billing Warnet Server
2. cclfox_0.7.1-2_i386.deb => Billing Warnet Server
3. libcclc_0.7.1-2_i386.deb => Pustaka Billing Warnet Client
4. cclcfox_0.7.1-2_i386.deb => Billing Warnet Client

Bisa kamu download di http://www.esnips.com/web/CafeConLenche

Dependencies yang diperlukan

* sqlite3
* glib2.0
* libfox1.6
* openssl

Pada Client & Server jalankan perintah berikut:

$ sudo apt-get install sqlite3 libsqlite3-dev

$ sudo apt-get install libfox1.6 libfox1.6-dev

$ sudo apt-get install libglib2.0-dev

$ sudo apt-get install libssl-dev

Edit /etc/ld.so.conf :
$ gksudo gedit /etc/ld.so.conf

dan tambahkan baris-baris berikut :
/usr/lib
/usr/local/lib

Lalu jalankan perintah :
$ sudo ldconfig

Billing Server

Untuk Billing warnet server download file berikut
libccls_0.7.1-2_i386.deb
cclfox_0.7.1-2_i386.deb

download ke home folder dan install:
$ sudo dpkg -i libccls_0.7.1-2_i386.deb
$ sudo dpkg -i cclfox_0.7.1-2_i386.deb

lalu jalankan Server Billing CCL dengan perintah:
cclfox -nossl

Billing Client

Untuk Billing warnet client download file berikut
libcclc_0.7.1-2_i386.deb
cclcfox_0.7.1-2_i386.deb

download ke home folder dan install:
$ sudo dpkg -i libcclc_0.7.1-2_i386.deb
$ sudo dpkg -i cclcfox_0.7.1-2_i386.deb

lalu jalankan Client Billing CCL dengan perintah:
cclcfox -host 192.168.0.254 -nama WS1 -nossl

Setting Tarif normal dan paket pada CCL, juga tips dan trik menyusul

Selamat mencoba :)

Monday, January 14, 2008

WRTG 54GL - DD-WRT - Reset Factory Default by SSH

yesterday i did some misconfiguration with my DD-WRT (dev-NET erte-erwe), ipact I cannot access trough web or LAN port or event wireless client.


- cannot ping (both wireless/LAN)

- cannot access ssh

- cannot access webadmin

- internet is OK (i can surfing)

unfortunately the AP was paced in tower, its dificult to reach again. finaly i googing and found this article. howto reset by ssh.luckily i can access it from remote machine over Internet, so by SSH to this dd-wrt i run this command

laptop ~~~X~~~>AP (wds dev-NET erte-erwe) -----OK---->AP1

laptop -------X--------> LAN (dev-NET erte-erwe)-----OK--------->AP1


reset procedure

Laptop ---------> {internet }------> router (dev-NET internet)------> Proxy ------> AP1 -OK---->AP (wds dev-NET erte-erwe)


DD-WRT v24 std (c) 2007 NewMedia-NET GmbHRelease: 12/26/07 (SVN revision: 8687)
root@192.168.1.1's password:
==========================================================

____ ___ __ ______ _____ ____ _ _
| _ \| _ \ \ \ / / _ \_ _| __ _|___ \| || |
|| | || ||____\ \ /\ / /| |_) || | \ \ / / __) | || |_
||_| ||_||_____\ V V / | _ < | | \ V / / __/|__ _|
|___/|___/ \_/\_/ |_| \_\|_| \_/ |_____| |_|

DD-WRT v24
http://www.dd-wrt.com

==========================================================


BusyBox v1.4.2 (2007-12-26 01:05:19 CET) Built-in shell (ash)
Enter 'help' for a list of built-in commands.

root@erte-erwe:~# mtd erase nvram;reboot
Unlocking nvram ...
Erasing nvram ...


have a nice experinece with dd-WRT

Suwidi


Factory Defaults

From DD-WRT Wiki

Jump to: navigation, search

Every router comes from the factory with certain options set on it. These options determine operating characterstics of the router under the factory firmware. See also Reset And Reboot for additional info on this topic (merge needed).

Contents

[hide]

[edit] NVRAM

Merge needed with Hardware#NVRAM. 

Every router has a memory chip inside that stores persistent settings between reboots. The NVRAM is also retained between flashes of different firmware versions or even different firmwares!

It is necessary to reset the NVRAM between flashes so that the new firmware encounters known values in the NVRAM.

For example, let's say that Firmware A sets the imaginary variable run_masq to "/usr/bin/masqrun", and this command is run at startup. Now, let's flash the router with Firmware B, which reads the run_masq variable determine whether the router does masquerading. Firmware B expects a boolean value here, such as "1" or "0". In the best case scenario, Firmware B will just throw an error and gracefully continue booting, but there could be cases where it errors out so badly that it bricks the router or makes it unbootable.

[edit] Configuration Save/Load

When you use the DD-WRT Web GUI to save your settings to a file, you are dumping the NVRAM settings to a binary file. Because of this, you should only use this feature to restore settings on the same router with the same firmware version. Again, do not restore setting backups from previous versions as mentioned in the forum.

[edit] Resetting to Factory Defaults

NOTE: This will not restore firmware to a previous state, it only clears the settings. Here are the ways that you can Reset to Factory Defaults.

[edit] Via the DD-WRT Web GUI

Under Administration -> Factory Defaults

[edit] Via the reset button on the router

Press and hold the button while the router is on, and keep holding it about 30 seconds. On different models you may see rapid flashing of a LED, or a red error or diagnostic LED. Wait for it to return to normal operation (typically power-LED on solid). Normal behavior here is for it to not actually clear the NVRAM. Many people think of it and phrase it that way. What it is supposed to do is return all settings to factory state. If you added new non-factory variables, they should still be there after this type of reset.

Holding down the reset-button while plugging in the router achieves a different goal. Here the bootloader is in charge, so getting it to clear the memory for you may have different results. Some platforms will completely empty the NVRAM and depend on another stage of the bootloader or firmware to repopulate it. On some less-supported hardware this may have unpleasant results.

[edit] From the Command Line (Telnet or SSH or Web GUI)

Log into the router over SSH and run the command:

mtd erase nvram;reboot

Note that some versions of DD-WRT may be missing the reboot command.

You can also run this command under Administration -> Diagnostics in the DD-WRT Web GUI.

[edit] Messing with the Router Insides

There are ways to physically short certain pins/traces inside the router in order to reset the NVRAM. VERY DANGEROUS! You can physically damage the flash memory chip and TRULY "brick" an otherwise working piece of hardware this way. Every other avenue of unbricking should be tried multiple times before resorting to this.

[edit]

Sunday, January 13, 2008

I've change IPCop configuration for RT/RW-net

here my tutorial base on,

dev-NET interet now server dev-NET(erte-erwe). this solution base on RT/RW network. previously RT/RW net is invent by Mr Ono W Purbo the expert IT system in Indonesia

RT/RW net is the solution for neighborhood internet connection. to reduce internet payment. each  neighborhood is shared internet by others
dev-NET erte-erwe was tried to serve internet to neighborhood. this servise maintenance by Suwidi (suwidi.or.id) as owner of dev-NET.

dev-NET has SLOGAN "internet sehat dengan paket SEPUASNYA"


1.2. Decide On Your Configuration
Prev  Chapter 1. Preparing to install  Next

1.2. Decide On Your Configuration

1.2.1. Network Interfaces

IPCop defines up to four network interfaces, RED, GREEN, BLUE and ORANGE.

1.2.1.1. RED Network Interface

This network is the Internet or other untrusted network. IPCop's primary purpose is to protect the GREEN, BLUE and ORANGE networks and their computers from traffic originating on the RED network. Your current connection method and hardware are used to connect to this network.

1.2.1.2. GREEN Network Interface

This interface only connects to the computer(s) that IPCop is protecting. It is presumed to be local. Traffic to it is routed though an Ethernet NIC on the IPCop computer firewall.

1.2.1.3. BLUE Network Interface

This optional network allows you to place wireless devices on a separate network. Computers on this network cannot get to the GREEN network except tightly controlled "pinholes", or via a VPN. Traffic to this network is routed through an Ethernet NIC.

1.2.1.4. ORANGE Network Interface

This optional network allows you to place publicly accessible servers on a separate network. Computers on this network cannot get to the GREEN or BLUE networks, except through tightly controlled "DMZ pinholes". Traffic to this network is routed through an Ethernet NIC.

1.2.1.5. Network Interfaces

Your firewall will need at least 1 Ethernet cable and network interface card (NIC). It may need up to 4 NICs, depending on the network configuration you choose and your connection to the Internet.

All NICs must be different physical cards (or their equivalent if you have multport cards).

Ignoring for a moment the RED network, you will have to plug a separate Ethernet NIC and cable into your firewall for each of the GREEN, BLUE and/or ORANGE network. The GREEN and RED networks are required. The ORANGE and BLUE networks are optional. The interface requirements for your RED network will vary depending on your connection to the Internet. The RED network may require an additional Ethernet card and cable.

sample networks

RED, ORANGE, BLUE, GREEN Configuration

The RED, ORANGE, BLUE, GREEN diagram shows that, other than the RED net, each of the networks needs an Ethernet card. If you are currently using an Ethernet connection to the Internet, you will need a card for it, too. The networks must have different network addresses.

Note

Remember, the BLUE and ORANGE networks are optional.

Table 1.1. NIC Requirements

ConnectionModemISDNUSB ADSLEthernet
RED, GREEN 1 NIC (G)1 NIC (G)1 NIC (G)2 NICs (G,R)
RED, BLUE, GREEN2 NICs (B,G) 2 NICs (B,G)2 NICs (B,G)3 NICs (B,G,R)
RED, ORANGE, GREEN 2 NICs (O,G) 2 NICs (O,G)2 NICs (O,G)3 NICs (O,G,R)
RED, ORANGE, BLUE, GREEN 3 NICs (O,B,G)3 NICs (O,B,G) 3 NICs (O,B,G)4 NICs (O,B,G,R)

1.2.1.6. Relative Security of IPCop Network Interfaces

The security model of IPCop is that the GREEN network is fully trusted and any requests from this network, whether initiated by a user or by a machine infected with a virus, Trojan horse or other "malware" is legitimate and allowed by IPCop.

A new feature of IPCop 1.4.0, allows for the Intrusion Detection System to be enabled for each network interface. It is always a good idea to glance at the IDS logs for your internal networks to see if a machine on your network is behaving strangely. This may indicate a virus infection.

The order of trustworthiness of networks in order of increasing trust is:

RED→ORANGE→BLUE→GREEN

1.2.2. Network Configurations

The base configuration is RED/GREEN where IPCop protects a single internal network from the Internet. If you have a wireless access point then you can attach it to the BLUE NIC and configure IPCop to restrict the access of machines on your wireless LAN. If you have some servers that need to be accessible to the Internet you can place them in an untrusted DMZ attached to the ORANGE NIC. You should decide which combination you want for your site.

1.2.3. Network Configuration Types

Since the RED interface can connect either by modem or by Ethernet, there are eight Network Configuration Types:

  • GREEN (RED is modem/ISDN)

  • GREEN + RED (RED is Ethernet)

  • GREEN + ORANGE + RED (RED is Ethernet)

  • GREEN + ORANGE (RED is modem/ISDN)

  • GREEN + BLUE + RED (RED is Ethernet)

  • GREEN + BLUE (RED is modem/ISDN)

  • GREEN + BLUE + ORANGE + RED (RED is Ethernet)

  • GREEN + BLUE + ORANGE (RED is modem/ISDN)

1.2.4. Connecting to the Internet or External Network

How are you currently connecting to the Internet, today?

If you are connected through an external broadband modem or router, you probably will be connected via an Ethernet network interface card or NIC. In any case, a similar card must be in your IPCop PC. If you are connected via an internal analog modem, ISDN modem, or ADSL USB modem, this must be moved to the IPCop PC. If you are connected via an external dial up modem, you will have to connect it to your IPCop PC.

This hardware will be used for your RED network interface.

Write down some key parameters from your current interface.

  • Check how you are currently obtaining your IP address: static, DHCP, PPPOE or PPTP.

  • If you obtain your IP address via DHCP, check to see if your system has a hostname it is providing to your ISP's DHCP server, see Checking Your DHCP Host Name, below.

  • Check what your name servers' addresses are. Your ISP's DHCP server may provide the addresses automatically or you may need to enter them manually.

  • Note any default sub domain addresses specified. These allow you to specify hosts like mail or news without entering the full host name, see the discussion in DHCP setup, below.

1.2.4.1. Checking Your DHCP Host Name

If you don't know if your ISP requires a host name, or you don't know what it is, check the paperwork that came with your ISP's installation kit or call their support center for help. If that fails, enter:

$ ifconfig -a 

on a *nix platform, and look at your eth0 IP address. On Windows 95, 98, ME, etc. the command is

C:\winipcfg 

entered from the command prompt. On Windows NT and Windows 2000, the command is

 C:\ipconfig /all 

In any case, write down your IP address and then issue an

$ nslookup nnn.nnn.nnn.nnn 

command, where nnn.nnn.nnn.nnn is your IP address. If you get a response, write down the full host name you receive. The first part may be your DHCP hostname, the last part may be used to configure IPCop's DHCP server.

1.2.5. Decide On Your Local Network Address(es)

Decide what your GREEN or local network address range will be. This is not the IP address provided by your ISP. Addresses on this interface will never appear on the Internet. IPCop uses a technique called Port Address Translation, PAT, to hide your GREEN machines from outside eyes. To make sure there are no IP address conflicts, it is suggested that you choose one of the address ranges defined in RFC1918 as private (non-routable) addresses. There are over 65,000 of these network address ranges you can choose from. For a list of available network address ranges, please see Appendix A . The easiest network to pick is the 192.168.1.xxx network. This will allow IPCop to handle over 250 computers. Typically routers and firewalls are placed at the top or bottom of the address range, so we suggest that you pick 192.168.1.1 for your GREEN network interface. IPCop will automatically set your network mask based on your IP address, but you can modify it, if you need to.

If you will be using BLUE and/or ORANGE networks pick different network addresses for each of them. For example, BLUE might be 192.168.2.xxx and ORANGE might be 192.168.3.xxx. This will allow over 250 computers on each network.


Prev  Up

Wednesday, January 09, 2008

Load Balancing two gateway with MikrotikOS

this is my refference when I create Load balacing Speedy + ISP .


I will write what excact my experience letter

Regards
Suwidi

Load Balancing over Multiple Gateways

From MikroTik Wiki

The typical situation where you got one router and want to connect to two ISPs:

Image:dual_gw_01.jpg

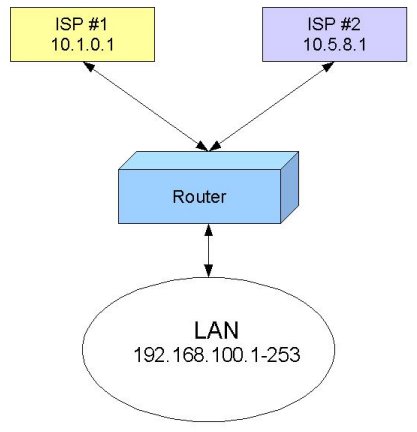
Of course, you want to do load balancing! There are several ways how to do it. Depending on the particular situation, you may find one best suited for you.

[ edit] Policy Routing based on Client IP Address

If you have a number of hosts, you may group them by IP addresses. Then, depending on the source IP address, send the traffic out through Gateway #1 or #2. This is not really the best approach, giving you perfect load balancing, but it's easy to implement, and gives you some control too.

Let us assume we use for our workstations IP addresses from network 192.168.100.0/24. The IP addresses are assigned as follows:

  • 192.168.100.1-127 are used for Group A workstations
  • 192.168.100.128-253 are used for Group B workstations
  • 192.168.100.254 is used for the router.

All workstations have IP configuration with the IP address from the relevant group, they all have network mask 255.255.255.0, and 192.168.100.254 is the default gateway for them. We will talk about DNS servers later.

Now, when we have workstations divided into groups, we can refer to them using subnet addressing:

If you do not understand this, take the TCP/IP Basics course,
or, look for some resources about subnetting on the Internet!

We need to add two IP Firewall Mangle rules to mark the packets originated from Group A or Group B workstations.

For Group A, specify

  • Chain prerouting and Src. Address 192.168.100.0/25
  • Action mark routing and New Routing Mark GroupA.

Image:dual_gw_22.jpg

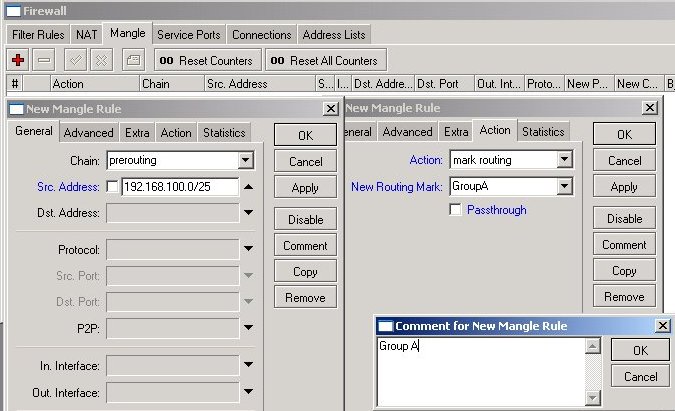
It is a good practice to add a comment as well. Your mangle rules might be interesting for someone else and for yourself as well after some time.

For Group B, specify

  • Chain prerouting and Src. Address 192.168.100.128/25
  • Action mark routing and New Routing Mark GroupB

Image:dual_gw_25.jpg

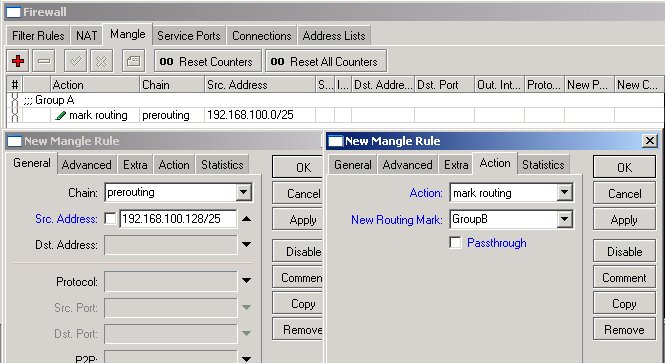
All IP traffic coming from workstations is marked with the routing marks GroupA or GroupB. We can use these marks in the routing table.

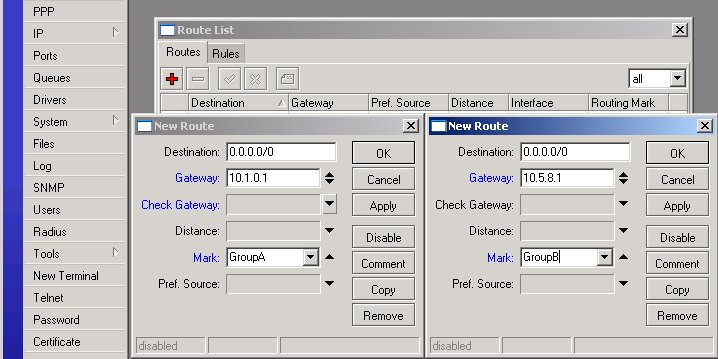
Next, we should specify two default routes (destination 0.0.0.0/0) with appropriate routing marks and gateways:

Image:dual_gw_26.jpg

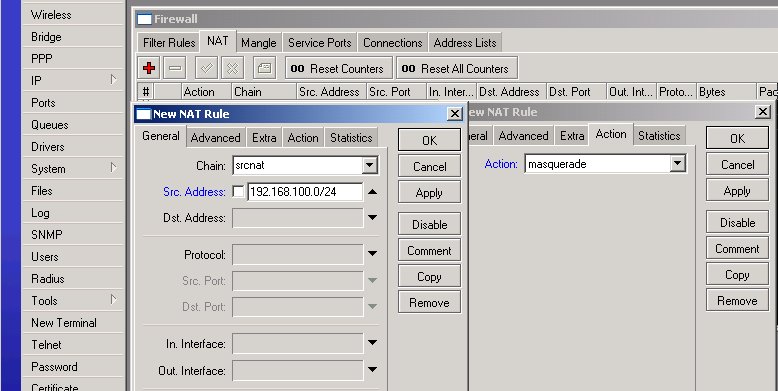
This thing is not going to work, unless you do masquerading for your LAN! The simplest way to do it is by adding one NAT rule for Src. Address 192.168.100.0/24 and Action masquerade:

Image:dual_gw_28.jpg

Test the setup by tracing the route to some IP address on the Internet!

From a workstation of Group A, it should go like this:

C:\>tracert -d 8.8.8.8

Tracing route to 8.8.8.8 over a maximum of 30 hops

1 2 ms 2 ms 2 ms 192.168.100.254
2 10 ms 4 ms 3 ms 10.1.0.1
...

From a workstation of Group B, it should go like this:

C:\>tracert -d 8.8.8.8

Tracing route to 8.8.8.8 over a maximum of 30 hops

1 2 ms 2 ms 2 ms 192.168.100.254
2 10 ms 4 ms 3 ms 10.5.8.1
...

You can specify the DNS server for workstations quite freely, just make it can be reached (test it by tracing the route to DNS server's IP address)!


Routes, Equal Cost Multipath Routing, Policy Routing

Document revision:2.3 (July 20, 2007, 13:21 GMT)
Applies to: V2.9

General Information

Summary

The following manual surveys the IP routes management, equal-cost multi-path (ECMP) routing technique, and policy-based routing.

Specifications

Packages required: system
License required: Level1
Submenu level: /ip route
Standards and Technologies: IP (RFC 791)
Hardware usage: Not significant

Related Documents

Description

MikroTik RouterOS has following types of routes:

  • dynamic routes - automatically created routes for networks, which are directly accessed through an interface. They appear automatically, when adding a new IP address. Dynamic routes are also added by routing protocols.
  • static routes - user-defined routes that specify the router which can forward traffic to the specified destination network. They are useful for specifying the default gateway
ECMP (Equal Cost Multi-Path) Routing

This routing mechanism enables packet routing along multiple paths with equal cost and ensures load balancing. With ECMP routing, you can use more than one gateway for one destination network (Note! This approach does not provide failover). With ECMP, a router potentially has several available next hops towards a given destination. A new gateway is chosen for each new source/destination IP pair. It means that, for example, one FTP connection will use only one link, but new connection to a different server will use another link. ECMP routing has another good feature - single connection packets do not get reordered and therefore do not kill TCP performance.

The ECMP routes can be created by routing protocols (RIP or OSPF), or by adding a static route with multiple gateways, separated by a comma (e.g., /ip route add gateway=192.168.0.1,192.168.1.1). The routing protocols may create multipath dynamic routes with equal cost automatically, if the cost of the interfaces is adjusted properly. For more information on using routing protocols, please read the corresponding Manual.

Policy-Based Routing

It is a routing approach where the next hop (gateway) for a packet is chosen, based on a policy, which is configured by the network administrator. In RouterOS the procedure the follwing:

  • mark the desired packets, with a routing-mark
  • choose a gateway for the marked packets

Note! In routing process, the router decides which route it will use to send out the packet. Afterwards, when the packet is masqueraded, its source address is taken from the prefsrc field.

Routes

Submenu level: /ip route

Description

In this submenu you can configure Static, Equal Cost Multi-Path and Policy-Based Routing and see the routes.

Property Description

as-path (text) - manual value of BGP's as-path for outgoing routeatomic-aggregate (yes | no) - BGP attribute. An indication to receiver that it cannot "deaggregate" the prefixcheck-gateway (arp | ping; default: ping) - which protocol to use for gateway reachabilitydistance (integer: 0..255) - administrative distance of the route. When forwarding a packet, the router will use the route with the lowest administrative distance and reachable gatewaydst-address (IP address/netmask; default: 0.0.0.0/0) - destination address and network mask, where netmask is number of bits which indicate network number. Used in static routing to specify the destination which can be reached, using a gateway
0.0.0.0/0 - any network
gateway (IP address) - gateway host, that can be reached directly through some of the interfaces. You can specify multiple gateways separated by a comma "," for ECMP routeslocal-pref (integer) - local preference value for a routemed (integer) - a BGP attribute, which provides a mechanism for BGP speakers to convey to an adjacent AS the optimal entry point into the local ASorigin (incomplete | igp | egp) - the origin of the route prefixprefsrc (IP address) - source IP address of packets, leaving router via this route
0.0.0.0 - prefsrc is determined automatically
prepend (integer: 0..16) - number which indicates how many times to prepend AS_NAME to AS_PATHrouting-mark (name) - a mark for packets, defined under /ip firewall mangle. Only those packets which have the according routing-mark, will be routed, using this gateway. With this parameter we provide policy based routingscope (integer: 0..255) - a value which is used to recursively lookup the nexthop addresses. Nexthop is looked up only through routes that have scope <= target-scope of the nexthoptarget-scope (integer: 0..255) - a value which is used to recursively lookup the next-hop addresses. Each nexthop address selects smallest value of target-scope from all routes that use this nexthop address. Nexthop is looked up only through routes that have scope <= target-scope of the nexthop

Notes

You can specify more than one or two gateways in the route. Moreover, you can repeat some routes in the list several times to do a kind of cost setting for gateways.

Example

To add two static routes to networks 10.1.12.0/24 and 0.0.0.0/0 (the default destination address) on a router with two interfaces and two IP addresses:

[admin@MikroTik] ip route> add dst-address=10.1.12.0/24 gateway=192.168.0.253
[admin@MikroTik] ip route> add gateway= 10.5.8.1
[admin@MikroTik] ip route> print
Flags: X - disabled, A - active, D - dynamic,
C - connect, S - static, r - rip, b - bgp, o - ospf
# DST-ADDRESS G GATEWAY DISTANCE INTERFACE
0 A S 10.1.12.0/24 r 192.168.0.253 Local
1 ADC 10.5.8.0/24 Public
2 ADC 192.168.0.0/24 Local
3 A S 0.0.0.0/0 r 10.5.8.1 Public
[admin@MikroTik] ip route>

Policy Rules

Submenu level: /ip route rule

Property Description

action (drop | unreachable | lookup; default: unreachable) - action to be processed on packets matched by this rule:
drop - silently drop packet
unreachable - reply that destination host is unreachable
lookup - lookup route in given routing table
dst-address (IP address mask) - destination IP address/maskinterface (name; default: "") - interface through which the gateway can be reachedrouting-mark ( name; default: "") - mark of the packet to be mached by this rule. To add a routing mark, use '/ip firewall mangle' commandssrc-address (IP address mask) - source IP address/mask table (name; default: "") - routing table, created by user

Notes

You can use policy routing even if you use masquerading on your private networks. The source address will be the same as it is in the local network. In previous versions of RouterOS the source address changed to 0.0.0.0

It is impossible to recognize peer-to-peer traffic from the first packet. Only already established connections can be matched. That also means that in case source NAT is treating Peer-to-Peer traffic differently from the regular traffic, Peer-to-Peer programs will not work (general application is policy-routing redirecting regular traffic through one interface and Peer-to-Peer traffic - through another). A known workaround for this problem is to solve it from the other side: making not Peer-to-Peer traffic to go through another gateway, but all other useful traffic go through another gateway. In other words, to specify what protocols (HTTP, DNS, POP3, etc.) will go through the gateway A, leaving all the rest (so Peer-to-Peer traffic also) to use the gateway B (it is not important, which gateway is which; it is only important to keep Peer-to-Peer together with all traffic except the specified protocols)

Example

To add the rule specifying that all the packets from the 10.0.0.144 host should lookup the mt routing table:

[admin@MikroTik] ip firewall mangle add action=mark-routing new-routing-mark=mt \
\... chain=prerouting
[admin@MikroTik] ip route> add gateway=10.0.0.254 routing-mark=mt
[admin@MikroTik] ip route rule> add src-address=10.0.0.144/32 \
\... table=mt action=lookup
[admin@MikroTik] ip route rule> print
Flags: X - disabled, I - invalid
0 src-address= 192.168.0.144/32 action=lookup table=mt
[admin@MikroTik] ip route rule>

Application Examples

Static Equal Cost Multi-Path routing

Consider the following situation where we have to route packets from the network 192.168.0.0/24 to 2 gateways - 10.1.0.1 and 10.1.1.1:

Note that the ISP1 gives us 2Mbps and ISP2 - 4Mbps so we want a traffic ratio 1:2 (1/3 of the source/destination IP pairs from 192.168.0.0/24 goes through ISP1, and 2/3 through ISP2).

IP addresses of the router:

[admin@ECMP-Router] ip address> print
Flags: X - disabled, I - invalid, D - dynamic
# ADDRESS NETWORK BROADCAST INTERFACE
0 192.168.0.254/24 192.168.0.0 192.168.0.255 Local
1 10.1.0.2/28 10.1.0.0 10.1.0.15 Public1
2 10.1.1.2/28 10.1.1.0 10.1.1.15 Public2
[admin@ECMP-Router] ip address>

Add the default routes - one for ISP1 and 2 for ISP2 so we can get the ratio 1:3:

[admin@ECMP-Router] ip route> add gateway=10.1.0.1,10.1.1.1,10.1.1.1
[admin@ECMP-Router] ip route> print
Flags: X - disabled, A - active, D - dynamic,
C - connect, S - static, r - rip, b - bgp, o - ospf
# DST-ADDRESS G GATEWAY DISTANCE INTERFACE
0 ADC 10.1.0.0/28 Public1
1 ADC 10.1.1.0/28 Public2
2 ADC 192.168.0.0/24 Local
3 A S 0.0.0.0/0 r 10.1.0.1 Public1
r 10.1.1.1 Public2
r 10.1.1.1 Public2
[admin@ECMP-Router] ip route>

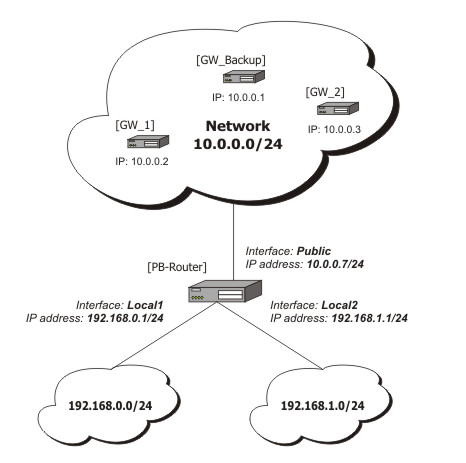
Standard Policy-Based Routing with Failover

This example will show how to route packets, using an administrator defined policy. The policy for this setup is the following: route packets from the network 192.168.0.0/24, using gateway 10.0.0.1, and packets from network 192.168.1.0/24, using gateway 10.0.0.2. If GW_1 does not respond to pings, use GW_Backup for network 192.168.0.0/24, if GW_2 does not respond to pings, use GW_Backup also for network 192.168.1.0/24 instead of GW_2.

The setup:

Configuration of the IP addresses:

[admin@PB-Router] ip address> print
Flags: X - disabled, I - invalid, D - dynamic
# ADDRESS NETWORK BROADCAST INTERFACE
0 192.168.0.1/24 192.168.0.0 192.168.0.255 Local1
1 192.168.1.1/24 192.168.1.0 192.168.1.255 Local2
2 10.0.0.7/24 10.0.0.0 10.0.0.255 Public
[admin@PB-Router] ip address>

To achieve the described result, follow these configuration steps:

  1. Mark packets from network 192.168.0.0/24 with a new-routing-mark=net1, and packets from network 192.168.1.0/24 with a new-routing-mark=net2 :

    [admin@PB-Router] ip firewall mangle> add src-address=192.168.0.0/24 \
    \... action=mark-routing new-routing-mark=net1 chain=prerouting
    [admin@PB-Router] ip firewall mangle> add src-address= 192.168.1.0/24 \
    \... action=mark-routing new-routing-mark=net2 chain=prerouting
    [admin@PB-Router] ip firewall mangle> print
    Flags: X - disabled, I - invalid, D - dynamic
    0 chain=prerouting src-address=192.168.0.0/24 action=mark-routing
    new-routing-mark=net1

    1 chain=prerouting src-address=192.168.1.0/24 action=mark-routing
    new-routing-mark=net2
    [admin@PB-Router] ip firewall mangle>
  2. Route packets from network 192.168.0.0/24 to gateway GW_1 (10.0.0.2), packets from network 192.168.1.0/24 to gateway GW_2 (10.0.0.3), using the according packet marks. If GW_1 or GW_2 fails (does not reply to pings), route the respective packets to GW_Main (10.0.0.1):

    [admin@PB-Router] ip route> add gateway=10.0.0.2 routing-mark=net1 \
    \... check-gateway=ping
    [admin@PB-Router] ip route> add gateway=10.0.0.3 routing-mark=net2 \
    \... check-gateway=ping
    [admin@PB-Router] ip route> add gateway=10.0.0.1
    [admin@PB-Router] ip route> print
    Flags: X - disabled, A - active, D - dynamic,
    C - connect, S - static, r - rip, b - bgp, o - ospf
    # DST-ADDRESS PREFSRC G GATEWAY DISTANCE INTERFACE
    0 ADC 10.0.0.0/24 10.0.0.7 Public
    1 ADC 192.168.0.0/24 192.168.0.1 Local1
    2 ADC 192.168.1.0/24 192.168.1.1 Local2
    3 A S 0.0.0.0/0 r 10.0.0.2 Public
    4 A S 0.0.0.0/0 r 10.0.0.3 Public
    5 A S 0.0.0.0/0 r 10.0.0.1 Pub

Mount and Unmout ISO images without burning them

taken from other site, i've combain two article, please read til the end of Capter


HOWTO: Nautilus Script to mount .iso files

I recently found a nautilus shell script on an older post to the forum that could mount .iso files, but it couldn't handle spaces in filenames or mount more than one file at once. After some struggle I've come up with these scripts which handle multiple concurrent mounts and filenames with spaces. You'll want to save these under ~/.gnome2/nautilus-scripts/ and make them executable:

Mount:
Code:
 #!/bin/bash
#
# nautilus-mount-iso

gksudo -u root -k /bin/echo "got r00t?"

sudo mkdir /media/"$*"

if sudo mount -o loop -t iso9660 "$*" /media/"$*"
then
if zenity --question --title "ISO Mounter" --text "$* Successfully Mounted.

Open Volume?"
then
nautilus /media/"$*" --no-desktop
fi
exit 0
else
sudo rmdir /media/"$*"
zenity --error --title "ISO Mounter" --text "Cannot mount $*!"
exit 1
fi
Unmount:
Code:
 #!/bin/bash
#
for I in "$*"
do
foo=`gksudo -u root -k -m "enter your password for root terminal
access" /bin/echo "got r00t?"`

sudo umount "$I" && zenity --info --text "Successfully unmounted /media/$I/" && sudo rmdir "/media/$I/"
done
done
exit0
To use either one just right click on the .iso file and use scripts -> mount. Hope someone finds this useful. Does anyone know if there's a way to make nautilus just unmount by right clicking on the volume icon on the desktop and selecting unmount volume?
__________________

Last edited by animacide : December 22nd, 2005 at 07:59 AM. Reason: Improved mounting script
Reply With Quote

Mount and Unmout ISO images without burning them

Posted by admin on December 22nd, 2006 EMail This Post

Some times you want to use iSO images without burning them.If you don't want to waste your CD's/DVD's here is the simple possible solutions using these tips you can mount and unmount ISO images without burning them.

I know two possible solutions

1) Using Nautilus Scripts

2) Using kernel loop module

Now we will see each one in detailed

Using Nautilus Scripts

I am taking this tip from here first you need to download two scripts for mount iso images download from here for unmount iso images download from here

Once you have these two scripts you need to change the permissions using the following commands

sudo chmod +x /home/username/mount.sh

sudo chmod +x /home/username/unmount.sh

Now you need to copy them nautilus scripts

sudo mv /home/username/mount.sh ~/.gnome2/nautilus-scripts/

sudo mv /home/username/unmount.sh ~/.gnome2/nautilus-scripts/

That's it now you are ready for mounting and unmounting your ISO images.

Example

Mount ISO Image

Now i have one ISO image if you want to mount you need to right click and select scripts —> mount-iso

Now it will prompt for root password and click ok

You can see the Mounter notification like the following

Here is the Successfully mounted message if you want to open this one click ok

This shows you available contents in mounted ISO image

Unmount ISO Image

Now i have one ISO image if you want to mount you need to right click and select scripts—>unmount-iso

Here is the Successfully Unmounted message

Using loop Kernel Module

First you need to make the directory to put the ISO into using the following command

sudo mkdir /media/isoimage

Now you need to add the loop module to your kernel.

What kernel loop module does?

I want to give brief introduction to kernel loop module.Using the module loop it is possible to mount a filesystem file. squashfs is a "loop" with (de)compression (Compressed Loopback Device) and it is possible to mount a compressed filesystem like a block device and seamlessly decompress its data while accessing it.

Use the following command to load loop module

sudo modprobe loop

Mount ISO Image

If you want to mount you need to use the following command

sudo mount debianetch.iso /media/isoimage/ -t iso9660 -o loop

In the above command you can replace debianetch.iso to your own iso image.

Now you should have your iso file mounted, and accessible from your desktop.

Unmount ISO Image

Unmount ISO Image Using the following command

sudo umount /media/isoimage

Monday, January 07, 2008

Prevent users from using MP3 files on your Windows 2003 Server

Prevent users from using MP3 files on your Windows 2003 Server

You can use Windows Server 2003 to prevent storage of unauthorized file types, including .MP3 files on your Windows 2003 file servers. This tip will show you how to configure the File Server Management Console (FSMC) to prevent the storage of .MP3 files on your server, and also how to create a file group and a file screen.
Prevent users from storing .MP3 files on your Windows Server 2003

You will need to access the Configure Your Server wizard to install the FSMC. To accomplish this, open the Configure Your Server wizard and add the role of File Server. Servers upgraded from Windows 2000 Server to Windows Server 2003 R2 have this role present. If your file server already has this role, you still need the FSMC, which you will install.

To install the FSMC component, complete the following steps:

1. Open the Control Panel.
2. Open the Add/Remove Programs applet.
3. Choose Windows Components.
4. Select the Management And Monitoring Tools component.
5. Click the Details button.
6. Check the box for the File Server Management console and click OK.
7. When the install completes, close the Windows Components wizard and the Add/Remove Programs applet.

Once you install the FSMC, open the console from the Administrative Tools menu; you can now create file groups for the disallowed file types. For example, you might create a file group called Music Files to contain .MP3 and .WMA files and create another group called Video Files to manage .MPG and .MOV files.

By creating file groups and creating a file screen that uses them, you can prevent the saving of unwanted file types. (There are other settings available for file screening, but they are outside the scope of simply preventing file saving.)

Follow these steps in the FSMC to create these groups:

1. Expand the File Screening Management node.
2. Right-click the File Groups object and select Create File Group.
3. Provide a name for the file group (in this case, Music Files).
4. Specify the types of files to include by entering the extension *.MP3. If you wish to disallow files with a certain pattern in the name, you can specify that pattern with wildcards — for example, you would add files beginning with Track using the pattern Track*.
5. Click the Add button to add the file type or pattern to the files to include dialog.
6. Add any types of files or patterns you wish to exclude from this group in the Files To Exclude box. Click Add.
7. When you finish adding all the file types to the group, click OK. The FSMC will display your new file group in the Details pane when you open the File Screening node.

You may also want to consider redirecting users' most used folders to a network location; this will make it easier to screen files. Follow these steps to create a file screen:

1. Open the FSMC and right-click the File Screening Management node.
2. Click Create File Screen.
3. Provide the name of the folder you wish to screen. An example would be the UNC path of the redirected personal folder of a specific user, e.g., \server01\users\jsmith.
4. Select the Define Custom File Screen Properties option.
5. Click the Custom Properties button.
6. On the Settings tab of the Custom Properties box, select Active Screening. This will prevent anyone from saving files that meet your specified conditions to the selected folder.
7. Select the Music Files group. (You will check the boxes of the file groups you wish to use.)
8. Click OK on Custom Properties and the Create File Screen dialog box.

Posted in Administrators, Microsoft, System, Windows, Windows Server 2003